Tuesday, December 27, 2011

A Must Have Baking CookBook!


Francine Segan has written Dolci :Italy's Sweets - a collection of Italy's traditional desserts. From Cannoli's to Tiramisu, she covers desserts from every region of Italy. She gives some great background and history to go along with each recipe. The recipe's are fun and give you a sense of the Italian culture.

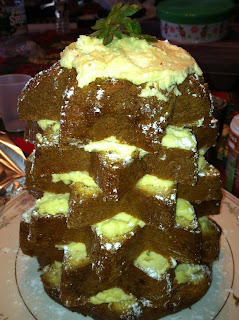
For Christmas, I decided to make the Recipe: Pandoro Christmas Tree Cake. I used a Shoprite Imported Pandoro and followed Segans recipe for the filling. The filling was amazing and so easy to make. It was definitely a hit on the Christmas dessert table. Buon Natale!


Recipe: Pandoro Christmas Tree Cake

Serves: Serves 10 
Ingredients
¾ cup sugar
6 tablespoons liqueur, such as Cointreau, or rum
2 large egg yolks
14 ounces mascarpone cheese
1 cup heavy cream
1 Pandoro* cake, about 1 pound
Candied cherries, fresh mint leaves, silver confetti, and crushed candy canes for decoration
Confectioners’ sugar
Instructions
1. In a small saucepan, combine 1/4 cup water and 1/4 cup of the granulated sugar and bring to a boil. Remove from the heat and stir in 4 tablespoons of the liqueur. Set aside.
2. In a medium bowl, with an electric mixer, beat the egg yolks and the remaining 1/2 cup granulated sugar for about 5 minutes, until light yellow and fluffy.
3. Beat in the remaining 2 tablespoons liqueur.
4. Fold in the mascarpone.
5. In a separate medium bowl, whip the cream until firm peaks form.
6. Fold the mascarpone mixture into the whipped cream.
7. Carefully, so as not to break the points, slice the pandoro horizontally into 6 slices. Brush the outsides of the slice (the browned parts) with the liqueur syrup.
8. Place the largest pandoro slice on a serving platter and spread with some of the mascarpone mixture. Cover with the next largest slice, angling it so that the points of the star don’t line up. Spread with some of the mascarpone mixture and repeat with the remaining layers, finishing with a dollop of mascarpone on top.
9. Decorate the points with candies or candied cherries and mint leaves.
10. Sprinkle the entire cake with confectioners' sugar and serve.
*Pandoro is available in many supermarkets beginning in the late fall. Thanks to the natural yeast used in making Pandoro, and despite containing no artificial preservatives, it lasts more than six months without refrigeration.

.....600 cookies later


Any baker would know, Christmas time is a busy baking season! Every year I make tons of Christmas cookies, put them in tins, and give them out as presents. But every year I seem to add more and more to the list. Here's how the process goes...I make my traditional cookies. This includes, butter cookies, chocolate chips, oatmeal, biscotti, pecan tassies, peanut butter cups, cinnamon-almond twists, apricot filling cookies, snow balls, and more butter cookies. Then I usually add one or two new cookies. This year I added a double chocolate cookie with a caramel filling. YUM!   Then, right before Christmas I lay out all the cookies on the dining room table, along with different size tins, and fill them up with 2 or 3 cookies of each kind. I put some powdered sugar and give them to my closest friends and family.  I usually save some to make platters for Christmas and Christmas Eve. Hope everyone had a wonderful holiday!


Sunday, November 13, 2011

First Time For Everything

For my past birthday, my boyfriend got me a photography lesson by one of the most talented photographers in our area. If you haven't noticed from my previous posts, my photography skills are lacking.  After my one-on-one session, I learned so much! I obviously couldn't wait to use what I learned on my dessert.  My mom has been asking me to make this pumpkin and chocolate cheesecake in her Woman's Day mag, so I decided this would be the perfect opportunity to take pictures. I've also never made a cheesecake before! I know, shocking. With the thousand springform pans I have, I decided to put one to use finally!


The bittersweet chocolate mixed with the pumpkin was phenomenal!  Here is the recipe. Enjoy!

Recipe Ingredients

  • 1/4 cup (1/2 stick) unsalted butter, melted, plus more for the pan
  • 1 9-oz pkg chocolate wafer cookies (such as Nabisco Famous Wafers)
  • 3 8-oz pkgs cream cheese, at room temperature
  • 1/2 cup fat-free Greek yogurt
  • 1 cup sugar
  • 2 Tbsp all-purpose flour
  • 2 tsp pumpkin pie spice
  • 2 tsp pure vanilla extract
  • 3 large eggs
  • 1 15-oz can pure pumpkin
  • 1/3 cup bittersweet chocolate chips (2 oz)

Recipe Preparation

  1. Heat oven to 375°F. Coat a 9-in. springform pan with melted butter.
  2. In a food processor, pulse the chocolate wafers to form fine crumbs. Add the melted butter and pulse to incorporate. Press the crumb mixture into the bottom and 2 in. up the sides of the pan. Bake until the crust is set and fragrant, 10 to 12 minutes. Transfer to a wire rack to cool. Reduce oven temperature to 325°F.
  3. Meanwhile, using an electric mixer, beat the cream cheese, yogurt, sugar, flour, pumpkin pie spice and vanilla in a large bowl until smooth. Beat in the eggs one at a time. Transfer 1 cup of the batter to a bowl. Beat the pumpkin into the remaining batter until fully incorporated. Pour the pumpkin batter into the cooled crust.
  4. Melt the chocolate in the microwave according to package directions. Add the chocolate to the reserved plain batter and stir until fully incorporated.
  5. Dollop the chocolate batter over the pumpkin batter. Using a table knife, make decorative swirls by pulling the chocolate through the pumpkin (do not overdo it or the colors will turn muddy).
  6. Bake the cheesecake until the edge is set and center still wobbles slightly, 50 to 55 minutes. Let the cheesecake cool completely in the pan, then refrigerate until chilled, at least 4 hours and up to 1 day.

Monday, November 7, 2011

Halloween Recap...

I normally don't go crazy on Halloween with different desserts, but this year was much different. Being that this is my first year teaching first grade, I went ALL out. I made different Halloween Cake Pops, Frankenstein cone cups, chocolate chip cookies (because I dressed up as the cookie monster), and got my students about every kind of Halloween candy possible.  I knew I over did it when one of my students came up to me and said..."ms teeeef (still cant say my name), my stomach hurts, I feel like I might bomit (yes with a B)"  


Halloween Venetian Hour!

Monday, October 24, 2011

Could it be true?

I went to Kohl's last night with my cousin and randomly came across this...
Babycakes Cake Pop Maker.

I  honestly felt like a little kid on Christmas morning.  I can't wait to try it out!  The thought of the  perfection of the round ball already being made is very exciting. Since Halloween is approaching, my plans for my friends, family, and first graders have been stirring in my mind. Stay tuned for a review on this machine and lots of Halloween treats to come!!!!


Thursday, October 20, 2011

When in doubt, choose both.

My 2nd post (1st post found below) on our eating tour in California is about our last final meal of the trip. For dinner, we ate at a small gourmet pizzeria in San Francisco. After sharing 5 appetizers, 2 entrees, and 3 pizza pies, we found ourselves, yet again,  talking about our next meal, dessert of course.

Betsy and Joe decided they wanted to take us to get ice cream. Betsy right away suggested Humphry Slocombe while Joe insisted on Mitchells.  John, Matt, Raquel, and I sat there stuffed as could be,  not thinking we could  fit another thing in our stomach. But as this conversation went on, our eyes lit up and we were immediately excited for what was to come. We went from a - 5 on the hungry scale to about a solid 9 while listening to the description of both places.

So the big question over dinner became...which place to go to? They went on for 25 minutes explaining the amazing crazy funky flavors at Humphry Slocombe and the deliciousness of Mitchells.  They said HS was trendy while Mitchells was old fashion.   Betsy said HS was like a new pair of expensive pumps that looked amazing but hurt while wearing them. She said Mitchells was like a really nice pair of sweatpants that you never want to come out of, which I thought had me sold, until Joe said, HS is every bakers dream. The more they explained, the harder it became to decide.  They both sounded amazing.  After going back and forth, they finally turned to us to ask what we wanted.  After listening to that conversation, it was too hard to choose.

We finished our meal, paid the bill, and dreaded the decision we had to make until....Joe said he finally had an idea. He decided we would go to both!!!

Yes, we went to both....don't judge.

Both places were exactly how they explained.  HS was amazing but very trendy and had the funkiest flavors.


Mitchell's had more of an old fashion approach, but had combinations of flavors that you can't even imagine. I had a scoop of Grasshopper pie. It combined my favorite ingredients of Oreos, Fudge, and Mint ice cream. I also had a scoop of Claire's pie which was coffee, almonds, and some other deliciousness.


Lesson Learned:  Never stress about choosing between two amazing ice cream places...GO TO BOTH! 

Overall, our trip will go down in history as being one of the best vacations we've ever been on.


Now you see it...Now you don't...

California was so amazing it deserves two posts!  John and I went to San Francisco, California along with our travel buddies (my cousin Matt and his girlfriend Raquel).  We went to visit my cousin Joe and his fiance, Betsy.  Let me give you some background on them... Joe has many degrees but my most favorite is his degree from the Culinary Institute of America.  He now has created many products, including The Best Rice In the World (click for amazingness). Betsy also went to culinary school for baking and is officially a baking goddess after I tasted her blueberry cobbler. To make a long story short, our time in San Francisco (and a mini - vaca while there to Napa) was nothing short of an amazing time. To sum up our weekend we ate and ate and ate and drank some wine and ate and ate some more. They both knew exactly where to take us to have the most amazing meals,  and while we were eating we were planning the next meal.

My first post will be about a dessert that we had while we were dining in Napa.  Betsy and Joe picked a place called, Cindy's Backstreet Kitchen. The food was phenomenal, but little did we know the dessert would be even better.  They made this dessert called Campfire Pies.  It is hands down a huge piece of heaven. It had an oreo cookie crust, fudgy chocolate, a little almond, and toasted marshmallow fluff.

 S'mores have a little history with John, Matt, Raquel and I because we seem to make it every place we go (even wedding after parties). Knowing this, Joe and Betsy planned this dinner solely around this dessert.

We ended up ordering 2...
best reaction ever!
and it was probably gone under 5 minutes....


Wednesday, October 5, 2011

Move Over Cake Pops.....

Cupcake + Ice Cream Cone + Vanilla Frosting + Sprinkles?  YES PLEASE!


Yesterday, I was asked to bake for a co-workers birthday. I obviously agreed and immediately went to the store after work. Being that I've only worked there for 1 month, I decided I would play it safe, and make a plain vanilla cake with vanilla frosting and sprinkles.  As I started mixing the ingredients, I knew I couldn't be that simple. My first thought?  Cake pops.  But then I remembered my long day of teaching 6 year olds and a brutal crossfit workout. I didn't have the energy to mash cake,  roll into perfect balls,  and dip into chocolate. So I looked through my cabinets for ideas and saw a box of cones.  I also remembered an article in  Rachel Ray's mag where she had made these (although my boyfriend swears he came up with idea)   So I decided to try it out.  It turned out to be a success!


You can use any cake recipe (or a box cake if you prefer). Place each cone in the cups of a cupcake pan. Then fill about 3/4 of the cones with the batter.  Cook as directed and eat with lots of frosting!


Up next....Brownies in a cone? hmmmm


Tuesday, October 4, 2011

Easy As Apple Pie...In A Skillet?

This weekend I decided to make an apple pie...but in a skillet!  I normally use a skillet for searing steak, pork chops, etc. Not this time! It was so easy too!  I used a 10 inch skillet and cooked some butter and brown sugar...

Then, I peeled and cored 4lbs of apples (Granny Smith and Braeburn). Mixed them with sugar and a little cinnamon (I tend to over due it with the cinnamon)...

Then, I made a simple pie dough recipe.. placed half of the dough over the cinnamon butter mixture, added the apples and put the remaining dough over the apples...Finally, I took the skillet and placed it in the oven...

1 hour later.....

Best Served w/ Vanilla Ice Cream!

Crisp, Juicy Apple PIE!!!!!


This recipe was actually taken from Southern Living Magazine..


Thursday, September 22, 2011

And I'm Back....

Wow...I can't believe its been 2 months since I've blogged!  I had just finished my 3rd official blog and BAM, I fall off completely.  Well, so much has happened since my last blog. I moved in with my boyfriend, and a week later we get a visit from Hurricane Irene completely ruining our entire first floor. Then, I start a brand new job (which would've been exactly 2.9 miles from my new home, instead I'm driving 45 minutes from my moms). My new job is teaching 25 little first graders! I love it, but wow is it tiring!  Baking? That's a whole other issue.  Half of my baking supplies are boxed up in my new home and half are still at my moms.  So where does this leave me? Well lucky for me, my mom is Ms. William Sonoma and has everything I need to continue my journey with baking while my life is on hold for a second (well looking more like 5 months).  Since I am celebrating fall with my little first graders and Im also going on our traditional apple picking adventure with my boyfriend this Saturday, I figured what better way to start a new blog than list my top 5 fall recipes that I WILL make!

1. Apple - Caramel Cheesecake

2. Apple Brownies

3. Apple pie in a skillet!

4. Pumpkin whoopie pies

5. Halloween witch cake balls


To Be Continued.......

Monday, July 25, 2011

Cake POP Fever


My first attempt at cake pops!
In the past few weeks, I've been on a cake pop binge.  It started about a month ago when my boyfriend, my cousin Matt, his girlfriend Raquel, and I went to Lake George for the weekend.  We rented a cottage by the lake, and relaxed and cooked all weekend.  I knew hands down that the number one dessert of the weekend would be smores, however I wanted to put a twist to it.  As I was on Bakarella's website (one of my favorite blogs) I decided to try cake pops for the very first time.  I was totally unprepared. I didn't know that I needed sticks and a piece of foam as a drying rack for the pops, but I continued on and they served there purpose for the weekend (the chocolate part of the smores!)

As weeks passed, I have perfected these cake pops.... I now can make perfect circles and know the right tools for the job.  My boyfriend has even put in a request for football shaped cake pops for the official football season!


I highly recommend eating it in one bite...


Here is the recipe I used....ENJOY!  - Bakerella's Yummy Cake Pops

Tuesday, July 19, 2011

My Best Friend's Getting Married!!!!

So last week we had a shower for my best friend, Jeana. All the bridesmaids contributed to this shower in various ways, however, I decided my contribution would be to bake over 400 cookies for the event. When I was growing up, my grandma would bake cookies for all my cousins' showers and even weddings.  It is an Italian tradition in my family.  When my grandma passed, I decided to take on the roll. So for the past few years I've been baking for anyone in my family who had a bridal or baby shower.  Here are a few highlights from previous showers.  

My Cousin Lisa's Baby Shower


Each table had its own platter.


My Cousin Tricia's Bridal Shower..Each guest had a goodie bag to take home some cookies!


For Jeana's shower, I decided to make a platter for each table.  They were such a hit!  I always get asked for my business card, and of course I never have one handy....maybe one day ill remember to actually bring them with me!
Here are a few pics from the shower..


Monday, July 11, 2011

COOOKIES!

"Life is uncertain. Eat Dessert First!"
I never thought in a million years I would be a blogger! I follow many and thought of starting my own, but never actually thought I would do it. I'm a 25 year old teacher, and have a love for baking....I bake for my family, my friends, my boyfriend (who didn't have a sweet tooth until he met me) and endless events.
I decided to start this blog because I realized the more I baked, the more requests I received for the goods and the recipes, and the more I wanted to talk about my baking. So what better way to share my opinions, experiences, and love for baking?
Expect to see some awesome recipes and pictures and great stories that occur in my crazy daily life!
Since I am most famous for my to die for chocolate chip cookies, I thought it would only be appropriate to add this recipe to my first post! Enjoy!


Time: 45 minutes (for 16-cookie batch), plus at least 24
hours’ chilling


2 cups minus 2 tablespoons
(8 1/2 ounces) cake flour
1 2/3 cups (8 1/2 ounces) bread flour
1 1/4 teaspoons baking soda
1 1/2 teaspoons baking powder
1 1/2 teaspoons coarse salt
2 1/2 sticks (1 1/4 cups) unsalted butter
1 1/4 cups (10 ounces) light brown sugar
1 cup plus 2 tablespoons (8 ounces) granulated sugar
2 teaspoons natural vanilla extract
1 1/4 pounds bittersweet chocolate disks or fèves, at least 60
percent cacao content or 3 cups of semi sweet morsels.


1. Sift flours, baking soda, baking powder and salt into a
bowl. Set aside.
2. Using a mixer fitted with paddle attachment, cream butter
and sugars together until very light, about 5 minutes. Add
eggs, one at a time, mixing well after each addition. Stir in
the vanilla. Reduce speed to low, add dry ingredients and
mix until just combined, 5 to 10 seconds. Drop chocolate
pieces in and incorporate them without breaking them.
Press plastic wrap against dough and refrigerate for 24
to 36 hours. Dough may be used in batches, and can be
refrigerated for up to 72 hours.
3. When ready to bake, preheat oven to 350 degrees. Line
a baking sheet with parchment paper or a nonstick baking
mat. Set aside.
4. Scoop 6 3 1/2-ounce mounds of dough (the size of golf balls)
onto baking sheet, making sure to turn
horizontally any chocolate pieces that are poking up; it will
make for a more attractive cookie. Sprinkle lightly with
sea salt and bake until golden brown but still soft, 18 to 20
minutes. Transfer sheet to a wire rack for 10 minutes, then
slip cookies onto another rack to cool a bit more. Repeat with
remaining dough, or reserve dough, refrigerated, for baking
remaining batches the next day. 


Eat warm, with a big napkin!!!!!